Jupyter Notebook is an open-source project that provide you with an interactive environment which combines rich text and executable code. These interactive environments are called notebooks which can run on computing servers for live interaction. JupyterLab is the next generation of the notebook interface. In this article, we will refer to Jupyter Notebook as a reference to both JupyterLab and Notebook interfaces.
To follow Fast.ai practical deep learning for coders course, I needed an environment to run codes written in Jupyter Notebook. Since, I have access to Microsoft Azure and have a subscription for testing out different services, I tried a few methods to run Jupyter Notebook. I needed an environment with minimum efforts to manage, so I could focus on the course materials. Azure Machine Learning seems to be working nicely for my needs. We will go through virtual machines and Azure Lab Services briefly. For Azure Machine Learning, I will give step by step instructions on how to set up the environment.
Method 1: Virtual Machine
Creating a virtual machine (VM) on a cloud environment is a common way of providing compute resources for programs and applications. Jupyter Notebook also need compute resources to run and to provide the interactive live experience. Depending on your code, you might need different amounts of RAM and CPU or GPU for deep learning and big data analysis.
You can create a clean virtual machine on Azure and install and configure Jupyter Notebook manually. For example, you can follow step-by-step instructions of installing a JupyterHub on an Ubuntu Server on Azure from this guide. JupyterHub is a multi-user version of the Notebook designed for companies, classrooms, and research labs.
Additionally, Azure marketplace also include a pre-installed and pre-configured virtual machine image for data science. The Data Science Virtual Machine (DSVM) is available for both Linux (Ubuntu 18.04 LTS) and Windows (Windows Server 2019). Some of the pre-installed tools are JupyterLab, RStudio Server, VSCode, PyCharm, etc. If you are doing deep learning and need to use GPU for computation, the DSVM will take care of the NVIDIA Drivers and CUDA toolkit setup.
Follow this quick start guide from official Azure documentation to create a data science virtual machine for Ubuntu and accessing your JupyterHub instance.
Virtual machines are mostly managed by users (not the cloud provider). Therefore, there is more room for customisation. For example, you can only install the programs you need on a clean virtual machine. As you have access to the VM as admin, you can change configurations and make any changes. Virtual machine method is recommended for projects for individuals and those who want to have more control over the environment.
Method 2: Azure Lab Services
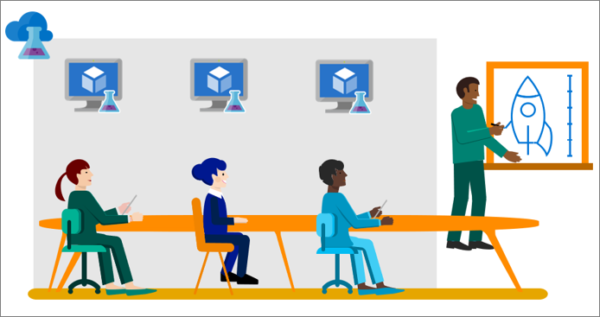
Azure Lab services is a managed service for quick and easy provisioning and tearing down virtual machines (VMs) at scale. Running Jupyter Notebook on Lab Services is suitable for teaching classes, running hackathons or for training a group of learners. Running a Lab is more efficient for teachers, as they do not have to manage any infrastructure by themselves, thus saving time.
A Lab has a template virtual machine image which has all the programs installed and configured for a successful training session. Then, we can create identical virtual machines from the template for each student. Students can access their own virtual machines and work independently on their project.
Azure official documentation provides instructions on how to create a lab using the DSVM image. There are minimum setup efforts for teachers and instructors, because DSVM is coming with JupyterLab pre-installed and pre-configured.
Method 3: Azure Machine Learning
Azure Machine Learning is a cloud service for end-to-end machine learning project lifecycle. Data scientists, machine learning engineers, and developers can use it to train and deploy models and manage machine learning operations (MLOps).
Example Use Case
For example, one can setup Azure Machine Learning for Fast.ai practical deep learning for coders course. The course materials are all written in Jupyter Notebook. There are various methods explained in the course website to setup the environment for running the course notebooks. I will cover setup for Azure Machine Learning here.
Step1: Create Azure Machine Learning
You need an Azure subscription to continue. Reach out to your organization to provide you a subscription if they have an agreement with Microsoft. Otherwise, create a free account before you begin.
In Azure portal, on the upper-left corner, select + Create a resource and search for machine learning. Select the Machine Learning and in the new opened pane, select Create to begin.
Each resource in Azure needs to be created inside a logical collection called Resource Group. If you do not have any resource group, select create new under resource group. You would need to choose a unique name for your machine learning workspace. Select a region which is the closest to you or your users. For the sake of this example, we will leave the rest of the fields as defaults.
If you want to configure your workspace further, you can follow these instructions from Azure documentation.
When you are finished configuring your workspace, select Review + Create. Review the settings and if all is good, select Create. It can take several minutes until your workspace and all its dependant resources are ready.
After successful operation, select Go to resource, to find your new machine learning workspace as shown in the image below. Select the workspace.

Step2: Launch ML Studio
Azure Machine Learning Studio is a web-based UI to access your workspace. Select Launch Studio.
In Studio, select Notebooks.

In Notebooks area, you can create new files and folders or upload your existing ones. For instance, if you already downloaded the Fast.ai notebooks to your computer, you could already upload the notebooks to your workspace storage. The files will be stored on the storage account which was created for this machine learning workspace.

Step3: Create a compute instance
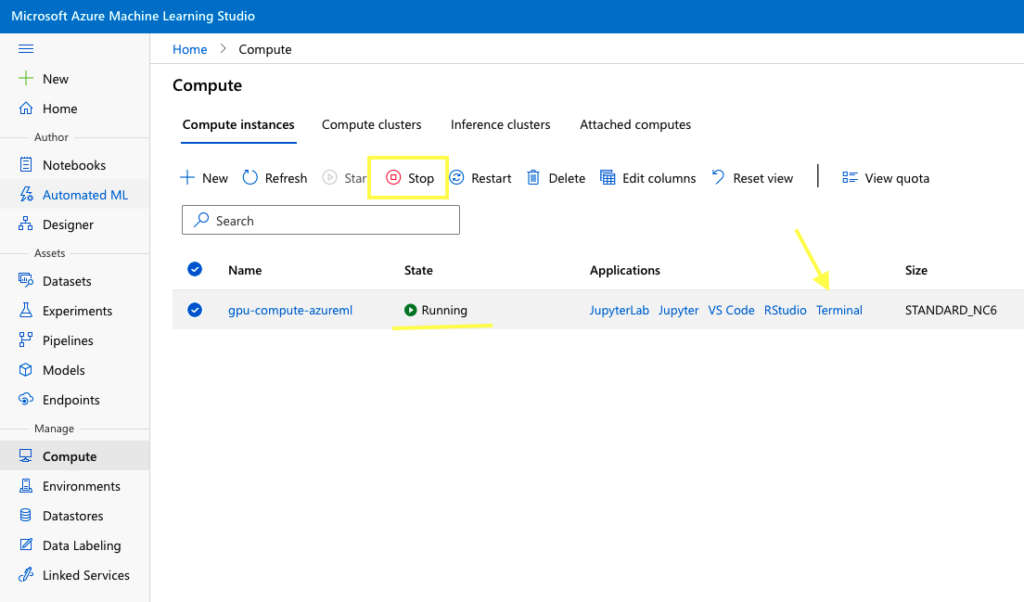
We need to create a compute instance to run the notebooks. Let us create a compute instance by selecting Compute from the left menu. Then select + New. Give your compute instance a name. We are going to select GPU virtual machine type because Fast.ai notebooks require GPU for deep learning. Image below shows different choices based on the number of cores, RAM, and GPU. We select Standard_NC6 which has one NVIDIA Tesla K80 and costs $ 0.97/hour. To save on computing costs, you can stop the instance whenever not in use. In addition, in Advanced Settings, you can set schedule for your instance to automatically start and stop. When you are done with configurations, select Create. It will take several minutes for your compute instance to be ready.

When your instance is up and running, you can check the state of the compute (running, stopped) from the compute menu. Compute instances are billed per usage, so it is a good practice to stop the compute instance when it is not in use.
Step4: Download notebooks
$ git clone https://github.com/fastai/fastbook.git
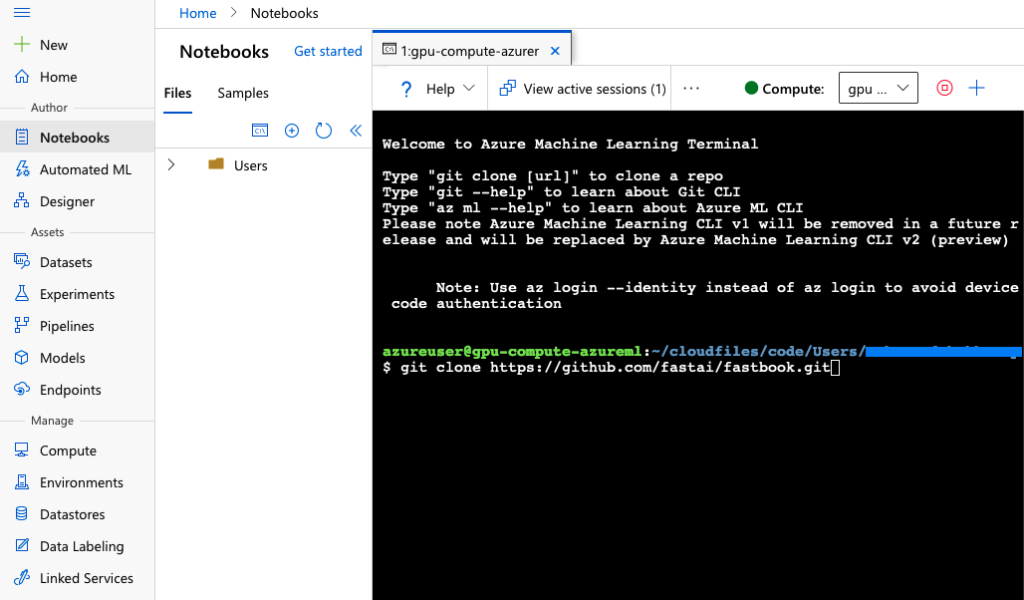
This will download your notebooks and your files will show up under the navigation pane. Fast.ai also has configuration for its kernel. To create a new kernel in your compute instance, follow these simple instructions. When the new kernel is created, make sure to select it as shown in image below.
Step5: Run notebooks
You can test running one of the notebooks and check the results. For example, from the Files navigation, find and open app_jupyter.ipynb file. Make sure the running compute and the correct kernel is selected. Go over the first block of code and press Shift and Enter. Kernel will show as busy when running the code and idle when the execution has finished.

Alternatively, you can also open the notebooks in your VS Code by selecting the Edit in VS Code. Follow the prompts to install required plugins for VS Code. More information about running your notebooks on VS Code can be found here.
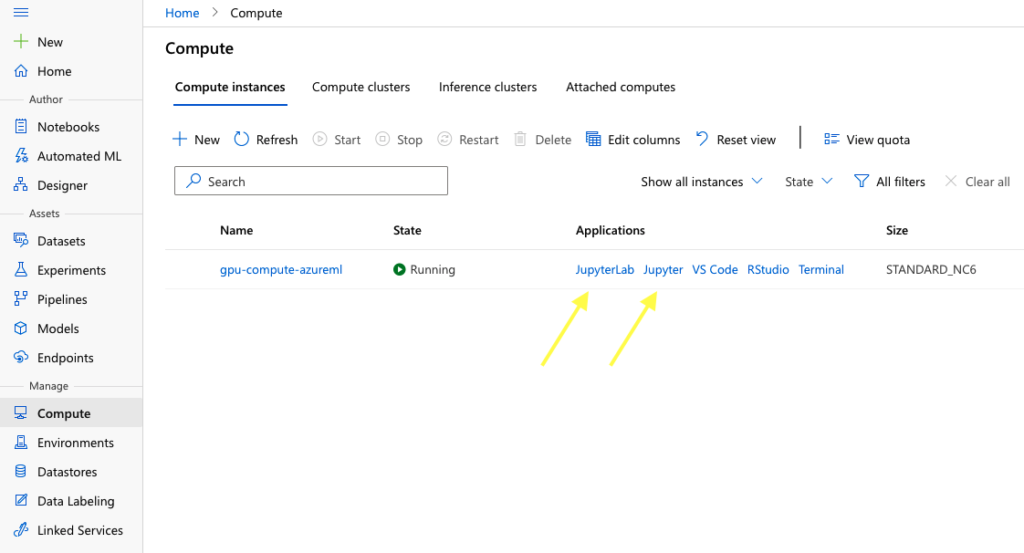
If you want to use Jupyterlab or Classic Jupyter Notebook interface, head over to Compute and select the application as shown in image below. Your selection will be opened in a new tab.
Conclusions
As discussed in this article, there are many methods to run notebooks on Azure. Some methods like virtual machines and Lab Services give more control over the environment.
Virtual machines are suitable for induvial projects where there is less need for sharing and collaboration. If your project is more long-term and requirements might change, virtual machines are a good possibility.
Lab Services are an excellent choice for deploying virtual machines at scale for teaching a group of students using JupyterHub. It works well for short-term class projects where everyone should have similar environment setup.
Azure Machine Learning seems to be easier to setup with different tools already integrated. Collaboration on a project is supported built-in in Azure Machine Learning making it a good option for teams.
It is good to note that pricing of managed services such as Azure Machine Learning might be a bit higher than other services. For instance, when we created Azure Machine Learning, Azure automatically created a storage account, key vault, and application insights which are paid services. Also, Azure uses load balancers in the background for your compute instances which are subject to a fee.
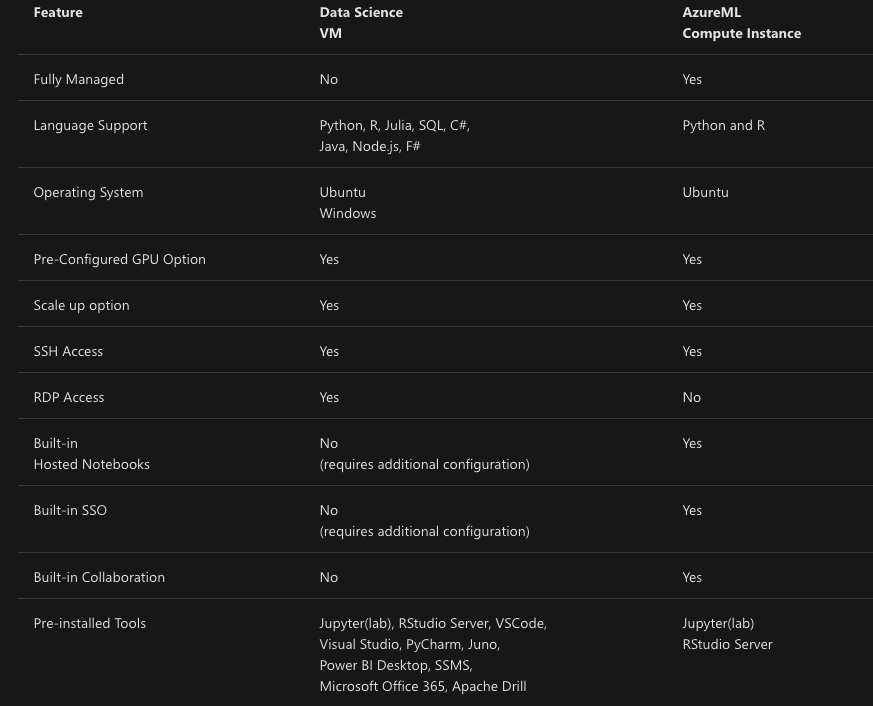
Here is a comparison of Azure Machine Learning and Data Science Virtual Machine.
At the time of curating this post, there are some free methods to run Jupyter Notebook such as Google Colab and Binder.